


abu baniaz
Moderator
If your receiver supports hardware multiboot, this plugin is not required. Best you ignore this thread.
Easiest way to check if your receiver supports Hardware Multiboot is to look in the Restart menu. If you have a multiboot function in there, it does.
Some receivers that support Hardware multiboot are listed below (best to check menu above as this thread will not be updated regularly.
Xtrend ET 8500
Mutant HD51
GB UE 4K/ Quad 4K
Zgemma H7
Octagon SF8008
Ensure you have a storage device using an ext file system. You can use a mechanical HDD but there will be a performance drop.
Note: If you only have one storage device, OpenVix will mount it as HDD. Your USB stick will be mounted as HDD.
To install it..
Menu > Plugins > Green (Download plugins) > Extensions > Scroll down to "openmultiboot(ver x + git y)"
Press OK and confirm the installation
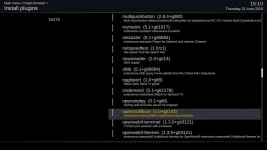
Access the OpenMultiboot" Plugin to continue setting it up
Menu > Plugins > Scroll down to "OpenMultiboot"
Select which device you want to use for openmultiboot
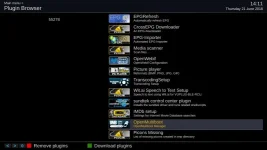
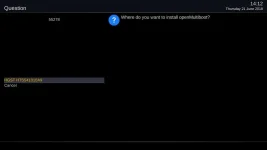
Two new folders will be created on your storage device:-
open-multiboot-upload (This is where you transfer the images zip files to)
open-multiboot (Do not concern yourself with this. This is where the images are installed)
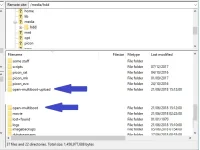
Download the image you want to your PC. Do not unzip/extract it.
Transfer the image zip file to the open-multiboot-upload folder using your preferred FTP applications
Installing the image
Menu > Plugins > Scroll down to "OpenMultiboot"
Press Green (install)
Highlight the desired image and then press OK. Image will be installed and this may take a while.
The zip file will be removed at the end of the installation process.
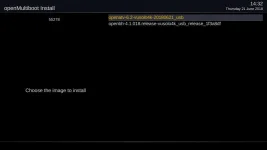
Selecting image to use
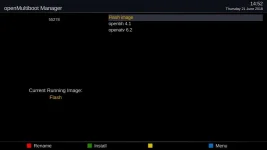
You will now be presented with a list of installed images. The default start-up image is the one installed on internal flash memory. You can change this by selecting the image and pressing OK.
When you reboot the receiver (different to restart GUI), you will be prompted as to which image you wish to run. Use your remote to select the image you wish to run if different to the one highlighted.
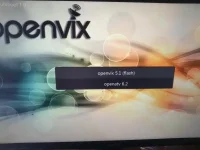
Deleting an installed image
Menu > Plugins > Scroll down to "OpenMultiboot"
Highlight the image you wish to remove and then press the Yellow (delete) button.
Easiest way to check if your receiver supports Hardware Multiboot is to look in the Restart menu. If you have a multiboot function in there, it does.
Some receivers that support Hardware multiboot are listed below (best to check menu above as this thread will not be updated regularly.
Xtrend ET 8500
Mutant HD51
GB UE 4K/ Quad 4K
Zgemma H7
Octagon SF8008
Ensure you have a storage device using an ext file system. You can use a mechanical HDD but there will be a performance drop.
Note: If you only have one storage device, OpenVix will mount it as HDD. Your USB stick will be mounted as HDD.
To install it..
Menu > Plugins > Green (Download plugins) > Extensions > Scroll down to "openmultiboot(ver x + git y)"
Press OK and confirm the installation
Access the OpenMultiboot" Plugin to continue setting it up
Menu > Plugins > Scroll down to "OpenMultiboot"
Select which device you want to use for openmultiboot
Two new folders will be created on your storage device:-
open-multiboot-upload (This is where you transfer the images zip files to)
open-multiboot (Do not concern yourself with this. This is where the images are installed)
Download the image you want to your PC. Do not unzip/extract it.
Transfer the image zip file to the open-multiboot-upload folder using your preferred FTP applications
Installing the image
Menu > Plugins > Scroll down to "OpenMultiboot"
Press Green (install)
Highlight the desired image and then press OK. Image will be installed and this may take a while.
The zip file will be removed at the end of the installation process.
Selecting image to use
You will now be presented with a list of installed images. The default start-up image is the one installed on internal flash memory. You can change this by selecting the image and pressing OK.
When you reboot the receiver (different to restart GUI), you will be prompted as to which image you wish to run. Use your remote to select the image you wish to run if different to the one highlighted.
Deleting an installed image
Menu > Plugins > Scroll down to "OpenMultiboot"
Highlight the image you wish to remove and then press the Yellow (delete) button.
Last edited:


