Hello sigpark,
I changed the skin and for the editing, I can use now the E2 skinner. For this, I use a trick: I delete the "Aliases..." part of the fonts in the skin.xml. After editing the skin with the E2 Skinner, I do back this part to the fonts. You can not see the .otf fonts with the E2 skinner, but it works. Greetings.
"<!-- Aliases that should be present -->
<alias name="Body" font="Regular" size="20" height="25"/>
<alias name="ChoiceList" font="Regular" size="20" height="25"/>
<alias name="TextNormal" font="Regular" size="20" height="24"/>"
Thanks Nashu. I have been doing a little reading on the forums and I see a number of folks have asked about editing some of the ViX stock skins - e.g. Vix Hd Night or Vix Magic Noire. I would like to add to your advice with what I have found out.
If you look at the skin.xml, you will see these ViX skins treat the "relative root" of the skin as their top level, with resources of the skin as sub folders of the skin parent template folder – i.e. the xml assumes
\buttons or
\fonts from the skin template root level attach point.
e2skinner looks for the resources from the perspective of its own resource subfolder
skins - when you install the app e2skinner creates 4 subfolders - skins + xml + fonts + elements. I refer to e2skinner install folder as
e2skinner/ after this point - it could be anything you choose when you extract the source of e2skinner
In Enigma2 skins are saved to /usr/share/enigma2. To use the e2skinner app with one of the ViX skins I suggest that you identify the common folder by opening the appropriate skin.xml and locating the
<include lines - these will give you the skin "common components" - for the "Noire" skin it is
MHDC, for Vix HD Night it is
ViX-Common - you will see this easily.
Next use the following steps to set the source up to use with e2skinner editor
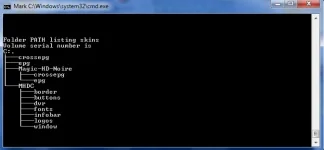
Step 1. There are a number of ways of achieving the following structure, but the easiest is to rename e2skinner\skins “skin folder” to “skins.old" and then create a new empty skins folder. Copy the two files background.jpg and prev.png to this new folder.
Step 2. Copy the
full contents of the skin you wish to work on to the top level of the e2skiner/skins/ folder you have created - i.e. the contents of /usr/share/enigma2/
Magic-HD-Noire to the e2skinner/
skins/ folder level, maintaining the folder structure - just moving it up one level!
Step 3. Copy the parent template folder of the skin e.g. /usr/share/enigma2/
Magic-HD-Noire to the e2skinner/skins/
Magic-HD-Noire folder (e2skinner looks for skin.xml in a skin folder). It seems like you are doing it twice, but e2skinner needs the “skin” and also the skin resources at a tree level above the skin template for the relative references explained above.
Step 4. As the "common" resources are directly referred to from a "level up" folder reference point of view e.g. MHDC/window/ or ViX-Common/buttons/ etc, copy the “template” common folder identified already as a sub-folder of the e2skinner/skins/ structure that you are working on e.g.
e2skinner/skin/MHDC/.
Step 5. Locate both the "main" skin.xml and the "common" skin.xml (from the common folder) and combine the two files into a single skin.xml, and save as skin.xml to the skin folder you
created in step 2. e.g.
e2skinner/skins/Magic-HD-Noire/skin.xml. Notepad++ is a good xml schema editor. Note, that you will identify the common xml as noted by "include" lines highlighted above.
This was tough to write clearly - I hope you think it is clear! Use e2skinner to edit
e2skinner/skins/Magic-HD-Noire/skin.xml, errors will be none or minimal - I hope!
These "cheats" will allow you to use e2skinner to make ur mods, and you can then use an editor to paste back your changes into the original file structure. Good Luck! I have attached an example of e2skinner/skins/
Magic-HD-Noire folder and the combined skin.xml file should be saved to
e2skinner/skins/Magic-HD-Noire/skin.xml
P.S. Moderators - if you feel this reply should be posted else where please feel free to move - thanks










 . Greetings.
